Cleaning and Collimating
Some basic notes on cleaning
This is almost guaranteed to convince you it needs cleaning.
Instead rely on your experience of past occasions of looking through it.
2. If in doubt — DO NOT LOOK AT THE GLASS WITH A TORCH !
DON’T ! DON’T ! DON’T !
3. Try your best to avoid moisture getting on it, this will allow dust to stick to it making it more difficult to clean without damaging the coatings.
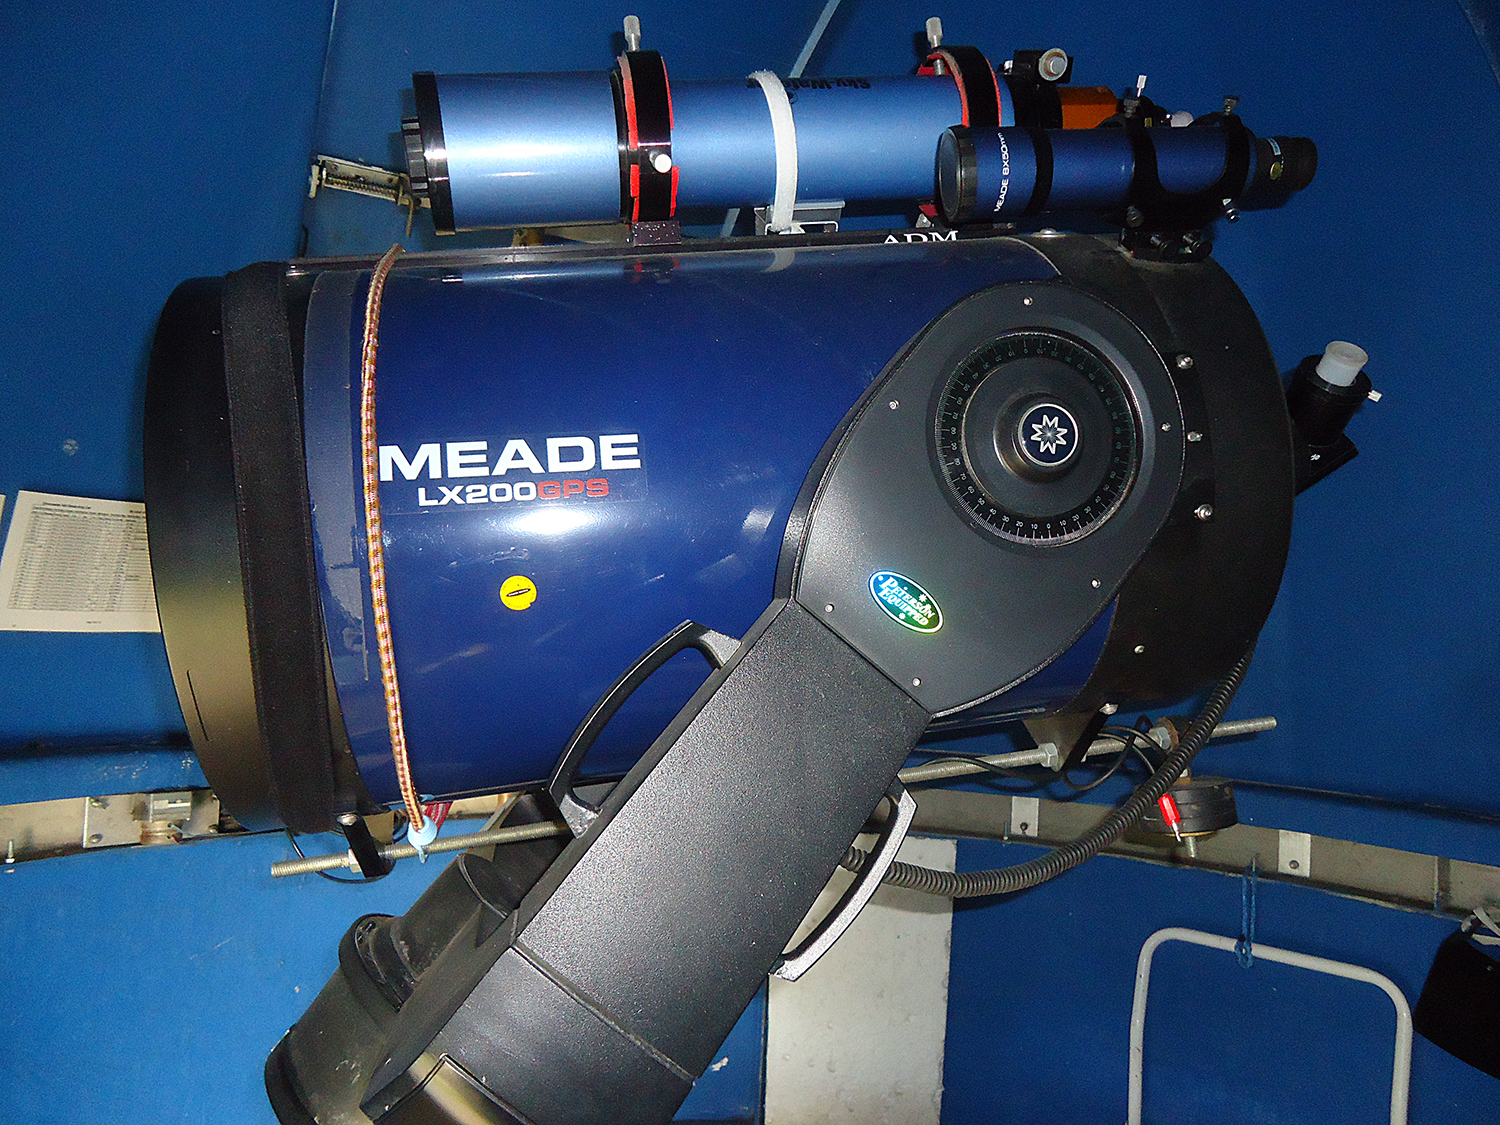
Cleaning the Corrector Plate of the Meade 14.
Now that you are very sure the corrector plate needs cleaning, this is how to go about it. The telescope should be off, so should be pointing at RA = due south and DEC = 90°. Slacken the clutches carefully, remembering that the tube is out of balance and heavy, and point it as low as you are comfortable with, but below the horizontal and tighten the clutches again.
With the hair dryer in one hand blowing cool air only and a 2″ or so soft paint brush in the other hand, brush the outer and inner end of the tube, the black painted metal outside the glass itself. Do the same to the metal outer face and sides of the secondary carrier too, removing all the dust you can.
Then with the brush well cleaned of dust, gently and carefully brush the glass face of the corrector plate. Do this horizontally, top half then bottom half, still with the hair dryer blowing cool air, and “flap” the brush’s bristles against a grease-free stiff edge, like the cleaned edge of the table, to remove dust after each pass across the surface.
All this is to remove loose dust only.
With a damp cloth, wipe all the metalwork so far dusted. This to prevent dust from there getting back onto the glass.
Now to the glass itself and the stuck on dust and grime.
Much has been said on what chemicals to use here, but the simplest is to use a detergent, a washing up detergent, preferably an un-perfumed one in solution with clean water, preferably but not necessarily, de-ionized in a light strength solution, as in washing the dishes. You are trying here to get dust off that has been stuck on by moisture and other contaminants.
Use a Kleenex tissue folded into a pad and well dampened. Pad it on the glass to dampen it, repeatedly unfolding and refolding the pad, to cover the whole surface, using clean parts of the pad each time. With another similarly dampened and folded tissue, starting at the top and working in quadrants, wipe the surface in short segments in a ROLLING manner. This means apply the pad, then immediately start rolling it backwards while moving the pad forwards. Stop, lift off, refold the tissue to expose an unused part, and continue the process, apply, roll backwards, wipe forwards.
Use many tissues, we are not here to minimise the use of tissues or save trees. Better to use many more tissues than needed than too few. There is sense in not bothering to refold tissues, using new each time is safer.
Be careful not to make the pads so wet as to pool at the bottom of the metalwork tube. Keep dabbing this area clear of water to stop it from tube past the seal.
You should have now cleaned the whole surface of the glass and it is likely to show sleeks. So do it all again, again with clean tissues. Recheck that all the metalwork is still dust free, and do it again. That makes 3 times washed.
If you are sure it is all well cleaned, you must be very sure it is all cleaned now, metalwork and glass, you can start buffing the glass with more tissues. Here you rub the glass to a polish, carefully of course, knowing that if dust is still there you will be rubbing it in, not off, and scoring the coatings.
One little but important point,don’t just follow these instructions as written, you must also keep looking for dust, everywhere, and here you can look at the glass with a torch, but with no other light, so the torch light stands out, and accentuates the dust.
Quite a lot of verbage there but all necessary, so don’t skimp the job.
BJ-28.1.16soaking into the interior of the
Collimating the Meade 14″
A relatively easy operation, but important. The aim is to get the optical elements of the telescope sitting exactly on the same centre line, exactly in line with each other.
Find a clear still night, if you can, though some haze isn’t going to spoil things, in fact it should help by steadying the atmosphere. Then a suitable star, about mag 3 to 2, and make sure it isn’t a double. Don’t use the star diagonal here. Though it might make you stretch your neck, the bendy bit could introduce an error and leave the job incorrectly done.
You will need to use two eyepieces, a 26mm one first, then repeat the job (greater accuracy) with a 9mm one.
With the 26mm eyepiece in, defocus the star to make a doughnut of it, a large white circle with a black circle in the centre, inside focus, not outside focus. Move the telescope carefully till the doughnut is in the middle of the eyepiece’s field. This is an important step. You can only judge the collimation with the star in the middle of the field, don’t try to judge it when it is near the edge. With the doughnut in the middle, and this is in the middle of the eyepiece field, not what you see in the eyepiece, which means you should put your eye close enough to the eyepiece to see the whole field. This to ensure you have the disc in the middle.
Now you can judge how good the collimation is. If the white disc and the black one are completely concentric, you need go only one step further, and that is to replace the 26mm eyepiece with a much shorter one, like a 9mm one. Again refocus the star to a doughnut condition, inside focus, and position it in the centre of the eyepiece field, and rejudge.
If the two discs are still concentric. The job is done.
However, if the white and black discs are not concentric, you have some work to do.
The same actions need to be taken with either eyepiece, so I’ll describe what you’ll need to do with the 26.
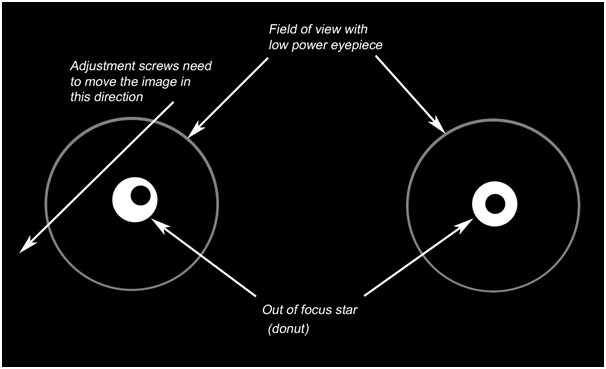
With the star out of focus and in the centre of the field, this is what you are likely to see, the one on the right is as it should be, and the one on the left as it may be, ie. in need of adjustment.
What you are actually seeing is the out of focus star, white, with the secondary mirror, black, in the middle or near it. The aim is to adjust the telescope so that the black disc is moved to the centre of the white disc.
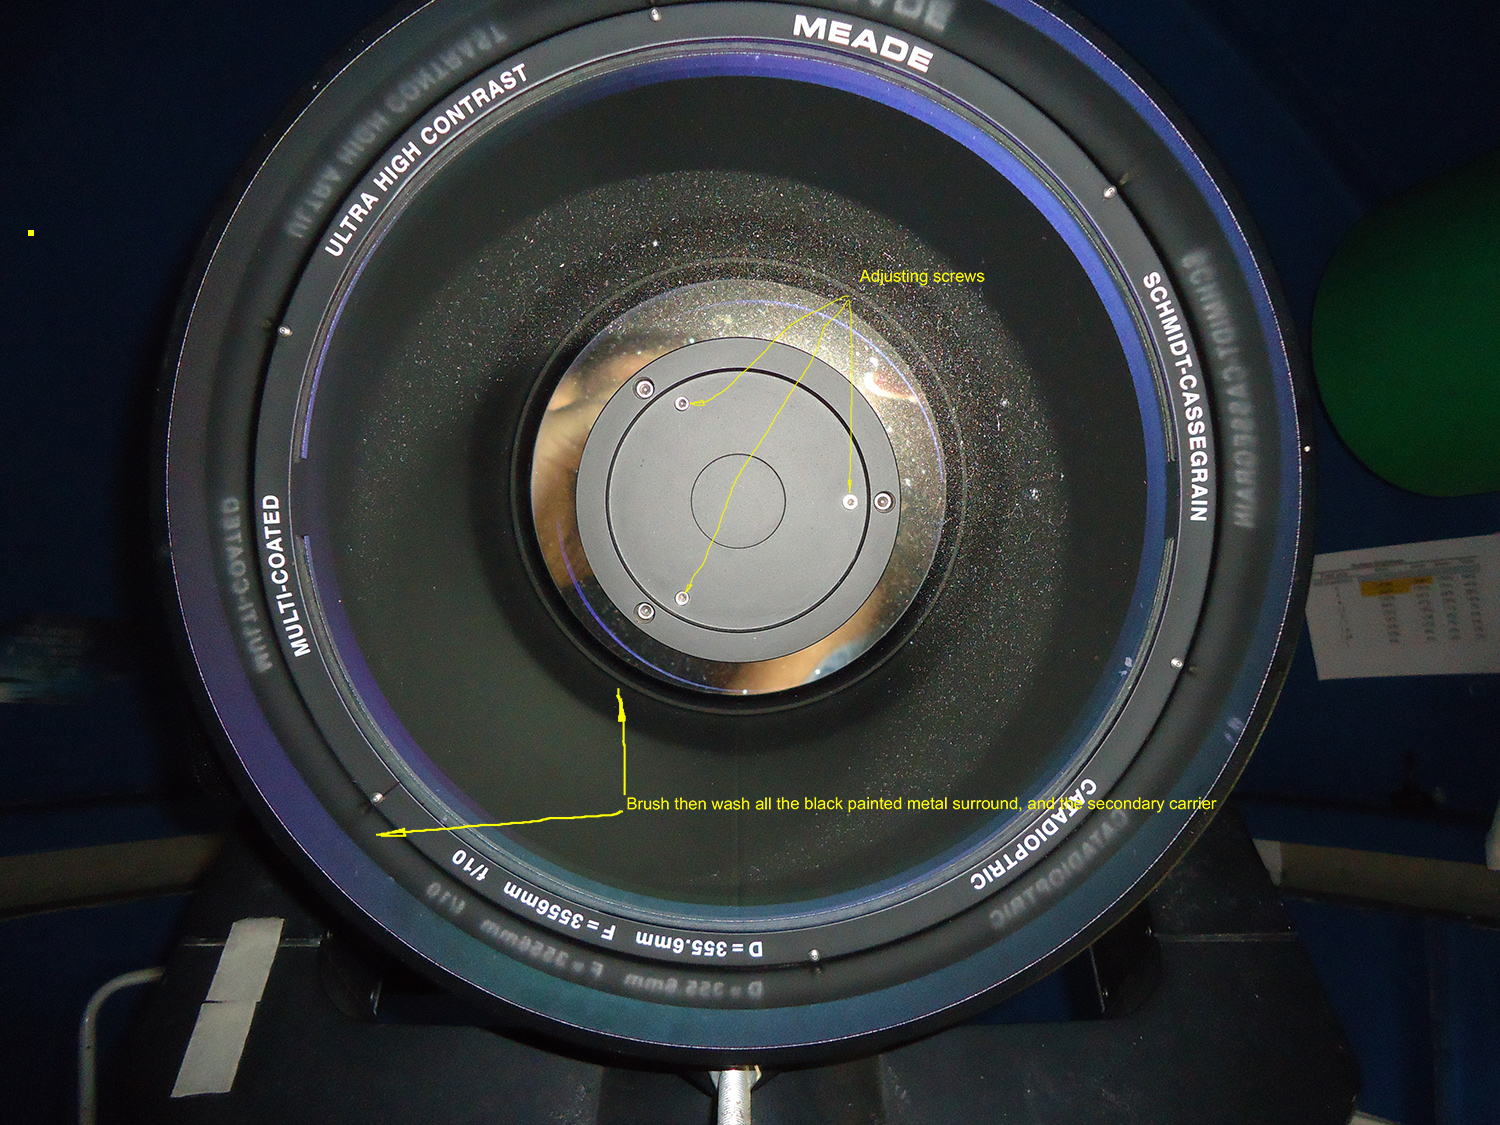
Before I go through the process, note the dust on the corrector plate in the photograph above. There is not yet enough to warrant cleaning it. This amount of dust should not be an obstruction to observing.
The only adjustment available on the Meade, as with all SCT instruments, is 3 screws in the secondary holder. We need to be careful here as there are actually 6 screws, 3 larger ones and 3 smaller ones. DO NOT TOUCH THE 3 LARGER ONES! These secure the secondary holder to the corrector plate. The adjusting screws are the 3 smaller ones, the inner circle. Note that the telescope was made in the USA, so these Allen screws are Imperial, not Metric, be sure to use the RIGHT size of Allen key. If it is too slack it may slip out of your fingers and clatter onto the corrector plate. These 3 screws are used to adjust the direction the secondary sends the light cone rearwards towards the eyepiece and collimation involves adjusting the 3 screws to make sure this happens.
To make an adjustment you slacken one and tighten the other 2 to compensate. This is not SLACKEN and TIGHTEN, but gently slacken one by no more that a sixth of a turn, and move the other 2 to just make contact.
This is difficult to describe as it is more a “feeling” of the metal contact. Not easy for those without some nuts and bolts experience.
So, carefully remembering the view you see in the eyepiece, and with your Allen key, slacken one of the screws by a sixth of a turn, and turn the other 2 to just make contact. Back to the eyepiece and re-centre the doughnut in the field with the direction keys, to see which way the black disc moved. It should have moved, but the game, well almost a game, is to remember where it was and which screw to turn, which way, to get the black disc to the centre of the white one.
Logic should tell you which screw to turn, but I’ve always failed, and found myself doing it by “trial and error, mostly error”. Nonetheless, you will at last get to the point where the black is concentric with the white.
The next step is to replace the 26mm with the 9mm eyepiece, and go through the process again. This is at a much higher magnification so the concentricity will be more difficult to judge, but the process is exactly as with the 26mm eyepiece. When completed you can add a Barlow, but it isn’t going to be much of a gain unless the seeing is perfect, and we all know it isn’t.
So recheck the screws, they should be just “nipped up”, so they don’t move, not tight. Unless you have very long arms, you’ll need two men to do the job, one at the eyepiece and the other making the adjustments at the top of the telescope, and it can be quite frustrating.
However, I’ve found that I can do it on my own with a webcam instead of an eyepiece, and a laptop on the table, while I stand on the stool and make the adjustments at the top of the telescope and control the direction keys to re-centre the doughnut in the field too. The webcam chip is so small that making a large adjustment of one of the screws will move the doughnut right off the screen, so it prompts me to make only small adjustments each time, much more in control.
BJ-1.2.16
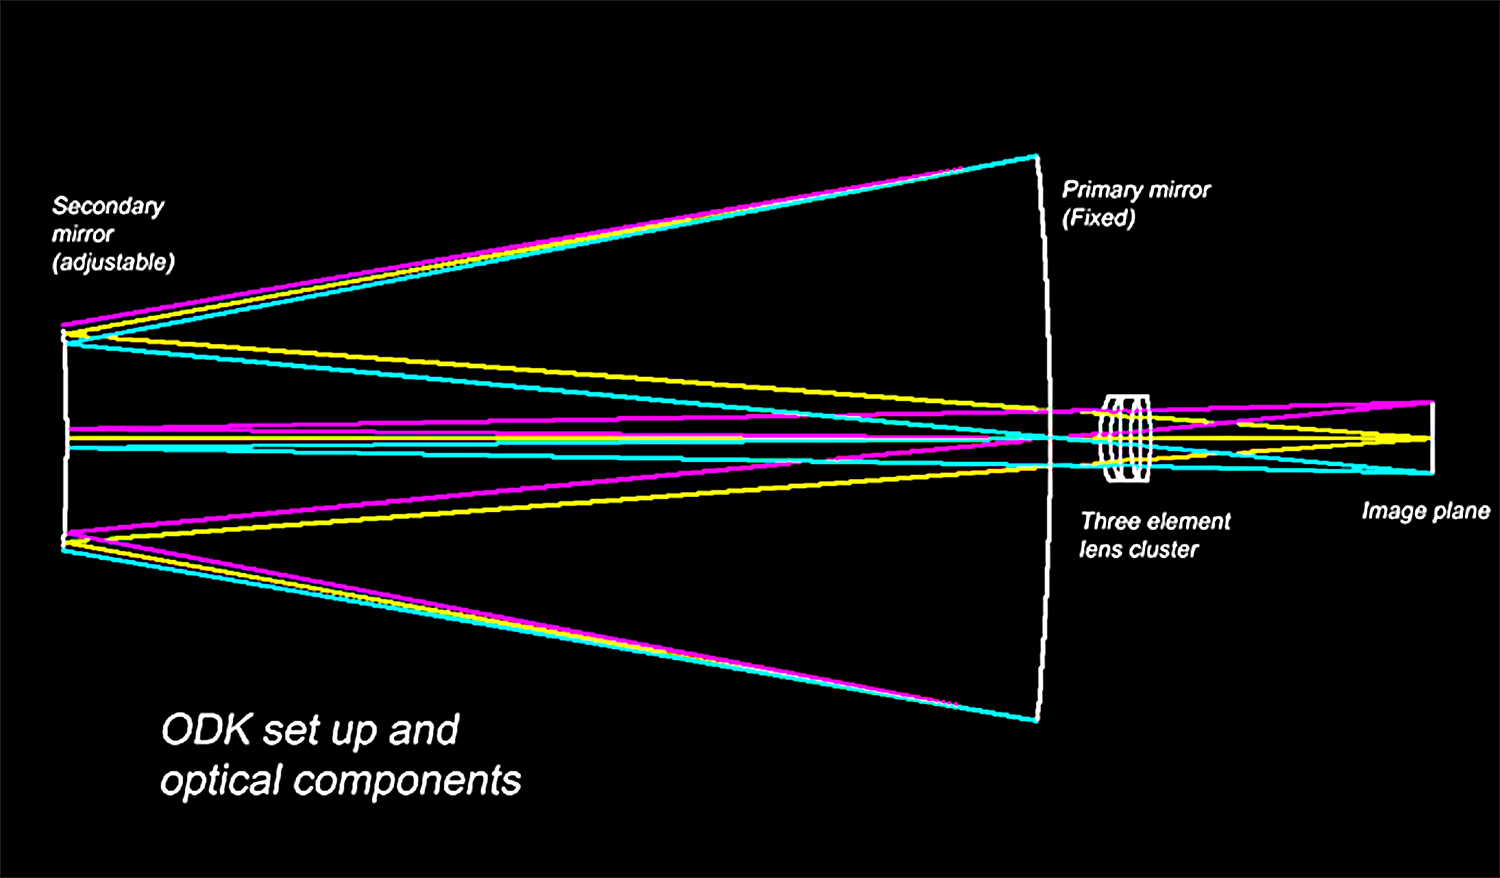
Cleaning the Primary of the ODK12
The ODK12 has five optical elements, the Primary Mirror, the Secondary Mirror and three Corrective lens elements in a group. The positions of the Primary and Corrective group are pre-set and fixed, square to the carbon tube.
Cleaning the primary a far more difficult job than cleaning the Corrector Plate of the Meade, so the best solution as for most things is prevention, here especially so.
The preventive methods are to –
Always run the cooling fans and to –
Always fit the dew shield for every visual and photographic session.
The fans’ power comes from the main 12v battery that runs the mount, and that is permanently being charged from the mains.
However, should it need cleaning, perhaps many, many years from now (see the photograph and note on the Meade 14″ cleaning page as to when it may need cleaning), I have an agreement from Barry Pemberton, Founder of the company, Orion Optics, and father of their MD, that if we contact them for a date, we can take the telescope to their factory in Newcastle Under Lyme, where they will clean the primary free of charge. To do so they will remove it from the telescope and clean it, then re-assemble it, re-set the mirror to mirror distance and provisionally collimate the secondary. It has to be removed from the tube to clean it, as it cannot be cleaned in situ without endangering seals etc. inside, so it is better done by them than by us.
Collimation from new is a 2 step process.
Step 1
Collimation is more easily done by two people one making the adjustments and the other checking the results. but it can be done easily enough by one if the chosen star is not too high up in the sky.
Fit the Ronchi tube into the 1.25″ adapter and the 26mm eyepiece into the end of the Ronchi tube, then screw the adapter to the telescope, a large thread. Point the telescope at a bright star, Mag 3 to Mag 1 and with the drive running, centre the star in the middle of the eyepiece field. Adjust the focuser so as to put the star out of focus, inside focus, not outside focus. Make sure the now doughnut shaped star is in the middle of the eyepiece field, this is important. To do it you’ll have to have your eye close to the eyepiece so you can see all the outside of the field. The white disc of the doughnut is the star and the black centre in it is the secondary mirror. The aim in collimation is to get both discs concentric with each other. If the black disc looks to be central or very close to it you have successfully completed Step 1.
However, if the image we see in the eyepiece is more like the one on the left of this image, we’ll have to make adjustments.
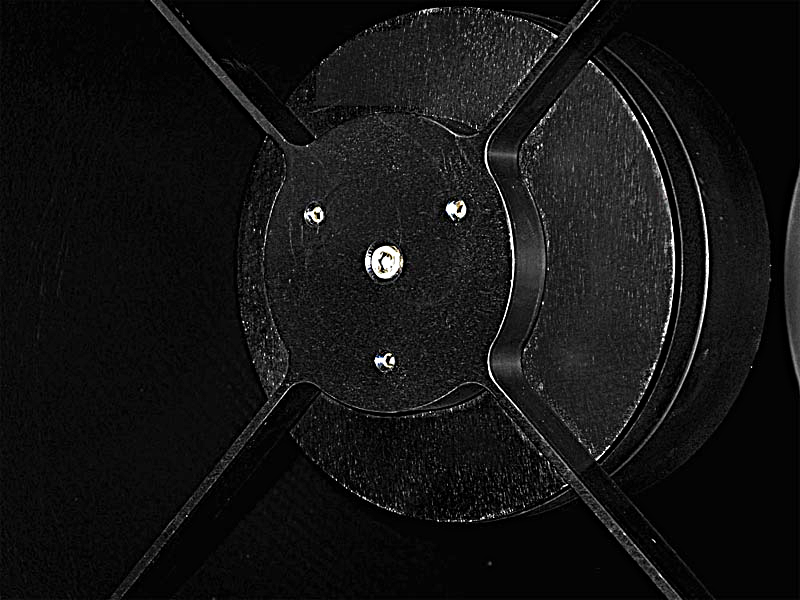
The picture above is of the secondary holder, showing the 3 collimation Allen screws, 3mm, and the larger central Allen screw, 5mm, which secures the secondary holder to the spider, don’t touch the central one at this stage. The central screw holds the secondary holder to the spider, the 3 adjusting screws work in a push/pull fashion. If you slacken one you can tighten the other two to get them all to a similar tension, and if you tighten one you should slacken the other two, but when making small adjustments it is not easy to do this.
Adjust one of the 3 collimation screws by about a 1/4 turn. Note – If you have got Step 1 done well this 1/4 turn is almost too much to move it. This is where you gain experience in collimation, knowing which screw moves the image in which direction. After 2 or 3 attempts it will become clear. Note in which direction the image in the eyepiece moved. Reposition the telescope to get the doughnut into the centre of the field again (note that you cannot judge accurately till you have the star in the centre of the eyepiece field). If it went in the right direction, continue to make adjustments in a similar manner. If it went in the wrong direction make opposite adjustments. A little time spent here, on the preliminary collimation will bear dividends later when we come to the final collimation with higher magnifications.
An easy method to remember which screw to move is to remember ‘Bulge — In’. This means turn the screw that matches the bulge of the doughnut, the thickest part, inwards. ie. clockwise.
Assuming we now have the black disc in the centre of the doughnut we have successfully completed the Preliminary Collimation and can move to Step 2, Final Collimation.
Step 2, Final Collimation.
Replace the 26mm EP with a higher one, 12 or 15mm and go through the collimation process with this eyepiece to obtain centrally located perfectly concentric white and black discs. This will be more difficult than with the 26mm eyepiece, but persevere. To improve still more, for photography, add a Barlow or a shorter EP, perhaps 4mm, or add a Barlow to the 15mm one, making the process even more difficult, and requiring very small adjustments to the adjusting screws, in the region of 1/16th of a turn of the Allen screws and corresponding care in getting the tension equal on the screws.
Using a high magnification eyepiece requires that we use eyes without any sign of astigmatism too.